How to Live View Security Camera Streams Online With Ultra Low Latency

In the world of CCTV and security surveillance, minimizing latency is crucial.
In this step by step guide, you'll learn how to view your security camera streams live on any browser, from anywhere in the world, with latency as low as 100 ms, using RTSP to WebRTC via IP Camera Master.
To achieve the lowest possible latency, we’ll leverage RTSP, the most widely supported protocol for real-time streaming from IP cameras. For higher latency but cheaper and easier configuration option you can take a look at FTP
Curious about RTSP and WebRTC details for live security camera viewing? Check out this blog post to learn more.
Step 1: Find Security Cameras Local IP Address
First, we need to find the IP address of your security camera. To do this, ensure the camera is powered on and connected to your local network via Ethernet or Wi-Fi. Once it’s connected and powered up, you can use scanner software like SADP on your laptop to locate the camera's IP address and configure its username and password. For detailed instructions, check out steps 1 and 2 in this blog post. Once you have the camera's local IP address, along with its username and password, make sure to note them down for future reference.
Step 2: Login To Your Routers Firmware Panel
Since we’ll be using the RTSP protocol, which follows a pull-based approach, IP Camera Master needs to be able to access your camera from outside the local network. To achieve this, we’ll need to adjust a few settings on your router to make the camera accessible externally.
First, we'll assign a static local IP address to your security camera to ensure its IP doesn’t change after a restart. Next, we'll set up port forwarding on port 554, which is the RTSP port. This port forwarding allows IP Camera Master to reach your camera from the internet via that specific port.
To configure these settings, let's first log in to your router's panel. You'll need the local IP address of your router. Typically, it is either 192.168.1.1 or 192.168.1.0. To confirm, open CMD on your computer and run the command `ipconfig`.
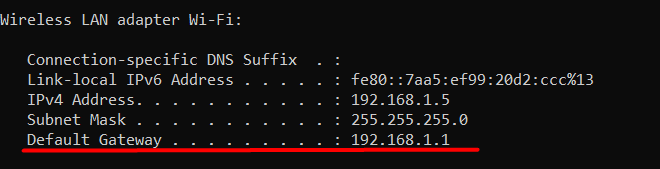
Copy the default gateway address and paste it into your browser’s address bar.

You will be directed to your router’s login page. Now, enter the username and password for your router. If you’ve never configured them, you can find the default login credentials for your router model here.
Step 3: Assign a Static IP to Your Security Camera
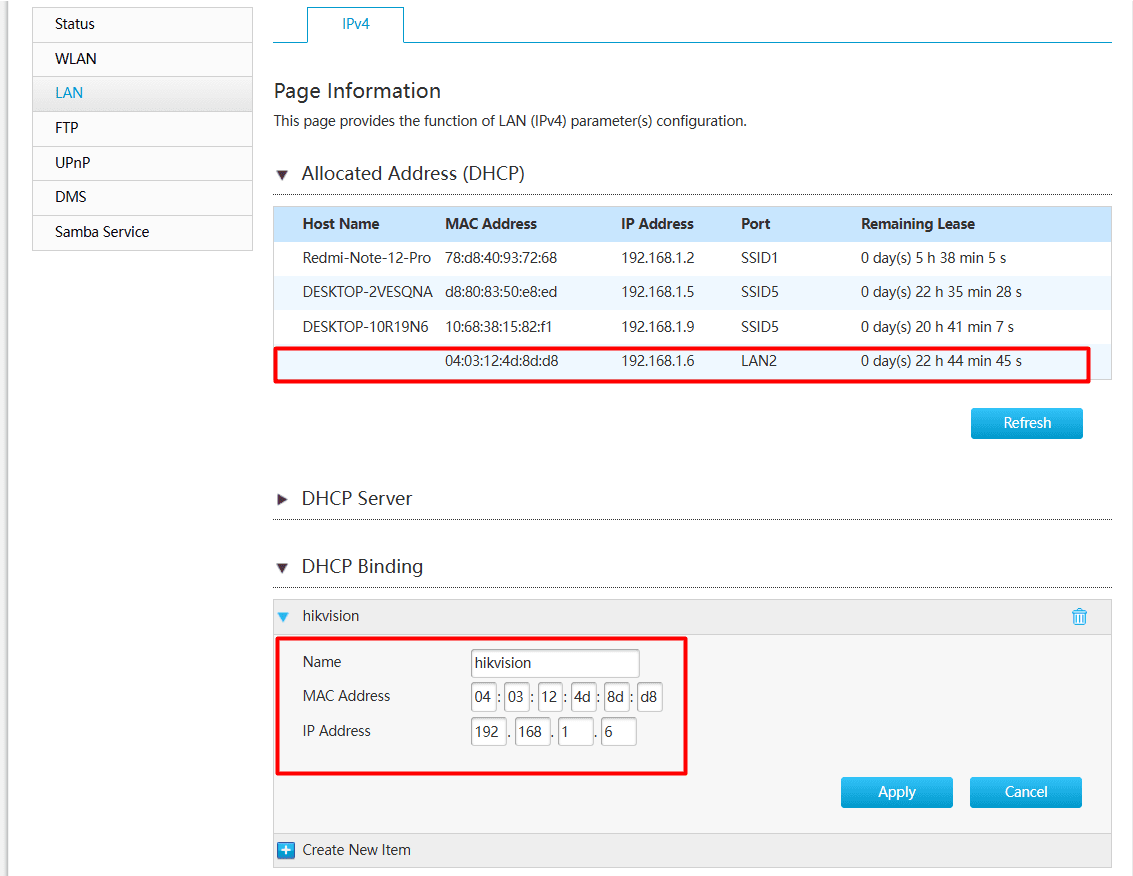
The first task is to assign a static local IP to your camera, so its IP address doesn’t change after a reboot. To do this, navigate to "Local Network" > "LAN Settings" and look for "DHCP Binding".
Note that the interface may vary slightly depending on your router model, but the names should be quite similar.
Once you find "DHCP Binding", use your camera's MAC address and IP address to make the assignment.
Follow these steps:
Give your assignment a name (e.g., "Hikvision" or "My Security Camera")
Enter the camera's IP address
Enter the camera's MAC address
Click on "Apply".
Step 4: Port Forwarding RTSP 554
In this step, we will do port forwarding of default RTSP port 554 so that IP Camera Master can reach your camera and pull the stream.
Go to "Internet" -- "Security" --- "Port Forwarding" section from your routers panel
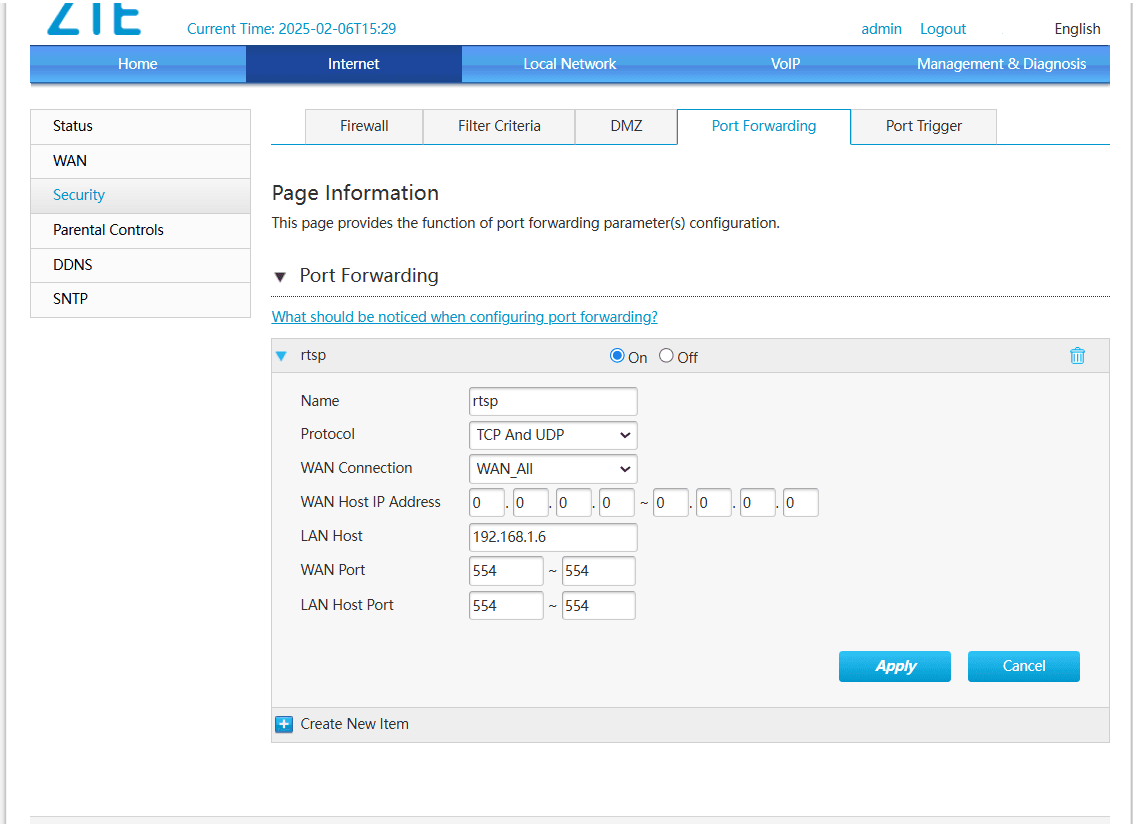
Click on Create New Rule and fill as below:
Name: Give some name to this rule (e.g rtsp)
Protocol: TCP and UDP
WAN Connection: WAN All
WAN Host IP Address: 0.0.0.0 - 0.0.0.0
LAN Host: Your security camera local ip address ( e.g 192.168.1.6)
WAN Port: 554
LAN Port: 554
If you see External and Internal Port in this menu, type 554 to both of it.
Click on Apply
Step 5: Verify Port 554 is Forwarded and Troubleshooting
In this step, we will verify if everything is set up correctly and the port has been forwarded successfully. To do this, go to Can You See Me.
On the website, you will see your public IP address. Enter 554 in the port field and click "Check Port".
If the website confirms that the port is accessible, great! You’re ready to move on to the next step. If it doesn’t work, the issue might be related to your ISP. To verify this, go to your router’s admin panel and check your public IP address.
If the IP address shown in your router’s panel differs from the public IP address displayed on Can You See Me, your router does not have a public IP address. This is why the port checker failed.
At this point, you must contact your ISP and request a public IP address for your router. This can be either dynamic or static (static may require an additional fee).
Once your ISP provides a public IP address for your router, return to Can You See Me and perform the verification again. It should work this time.
Step 6: Construct RTSP URL and Create New Camera
Once port forwarding is completed succesfully, it means that we can move to the actual fun part where we construct a RTSP url and create a new camera on IP Camera Master!
Go to IP Camera Master dashboard and click on "New Camera"
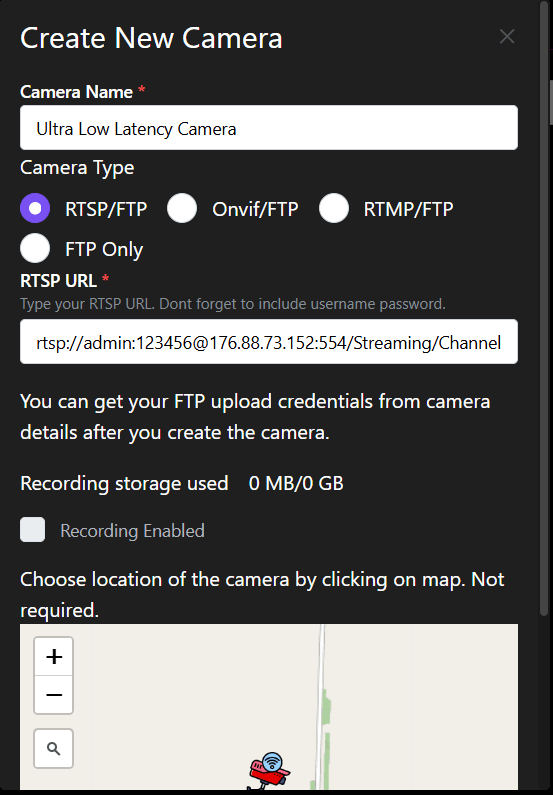
Choose RTSP as camera type.
Here you need to fill RTSP url field with a custom RTSP url which contains username, password of your camera, your public ip address and port 554 with the location of stream.
rtsp://[username]:[password]@[ip_address]:[port]/[path]
Example:
rtsp://admin:123456@176.88.73.152:554/Streaming/Channels/101
The RTSP URL path can vary depending on the camera manufacturer and model. To construct the RTSP URL specific to your camera, check our RTSP Database.
Click on "Create Camera".
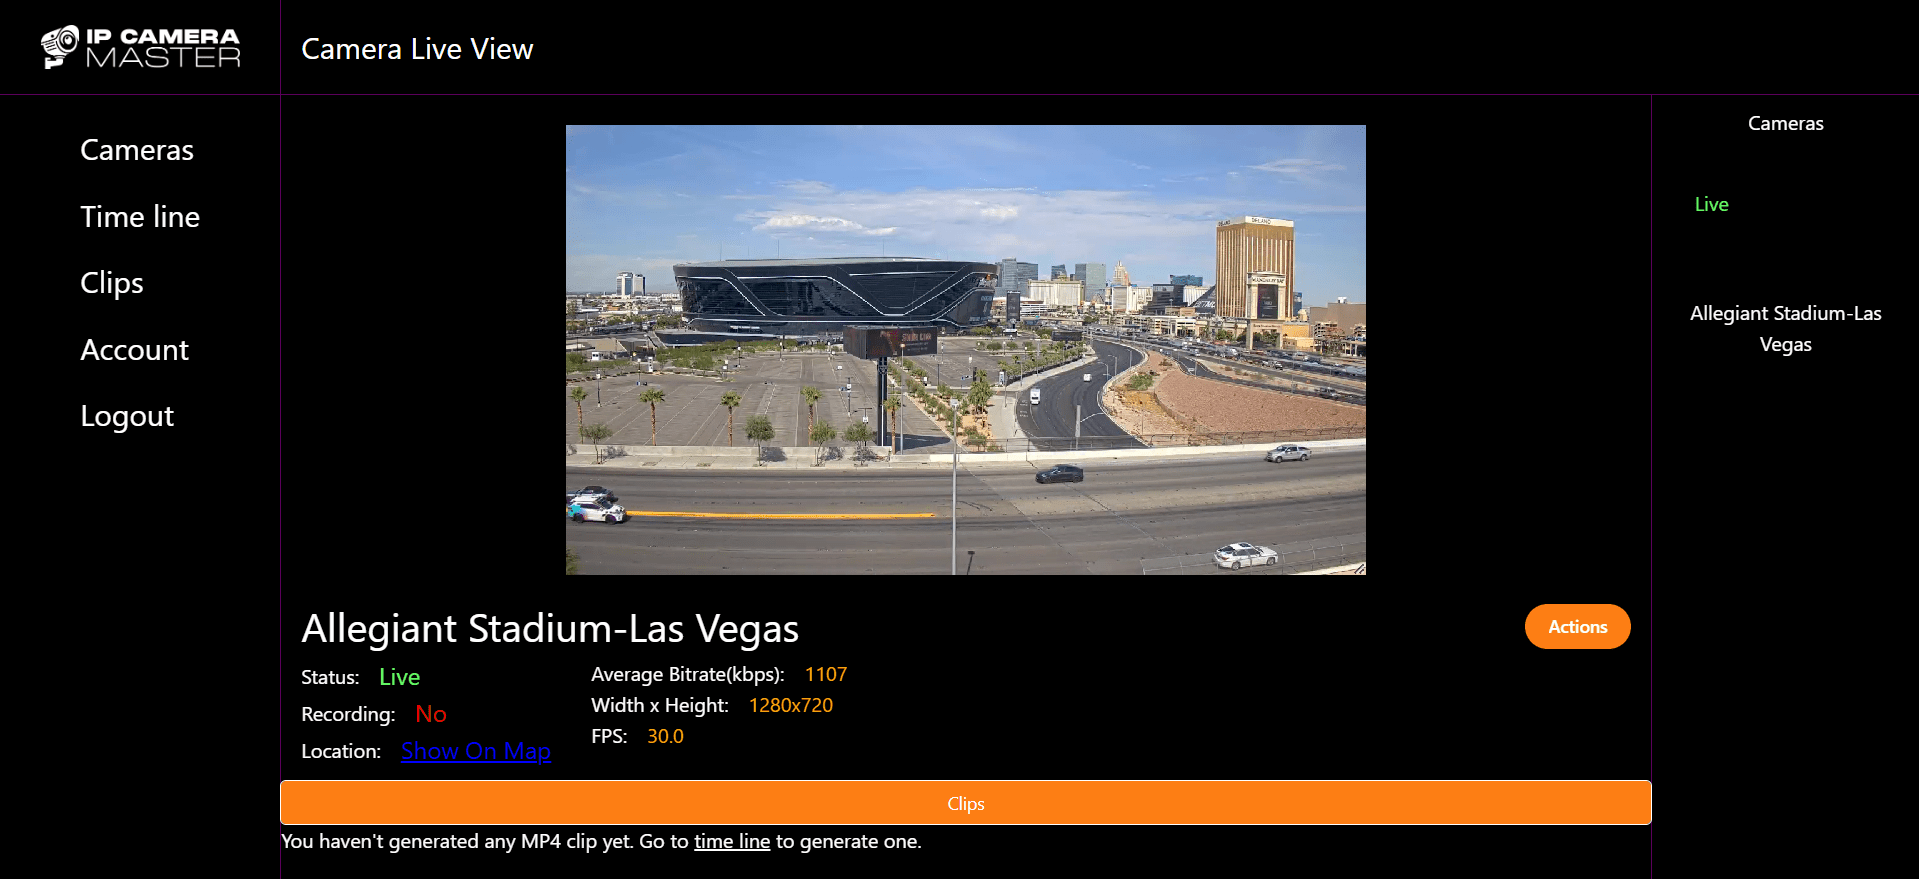
That’s it! If everything is set up correctly, within a few seconds, the status should change to Live. Now, you can watch the security camera stream with just 100-200 ms latency, thanks to IP Camera Master.
Conclusion
In this article, you've learned how to make your security camera's RTSP stream accessible from the internet. IP Camera Master pulls your RTSP stream, converts it to WebRTC format, and allows you to watch it from any browser with ultra-low latency. If you encounter any issues during the setup, feel free to reach out to us at support@ipcameramaster.com. Our team will be happy to assist you promptly, free of charge!
Enjoy seamless, ultra-low latency video surveillance!
Similar Posts
FTP vs RTSP for Security Cameras: Which is Best for Live Viewing and Cloud Recording?
2025-02-01Explore the key differences between FTP and RTSP for security cameras. Learn which protocol is best for live viewing and cloud recording, based on your needs for real-time streaming and secure footage storage.
FTP vs. RTSP vs. ONVIF vs. RTMP: Which is Best for Video Surveillance?
2025-02-02Choosing the right protocol for video surveillance is crucial for security and efficiency. This guide compares FTP, RTSP, ONVIF, and RTMP to help you determine which best suits your needs.

How to Watch Your Security Cameras Online in Real-Time
2024-11-15Learn how to live watch your IP security cameras online step by step. With IP Camera Master you can watch your FTP, RTSP, RTMP security cameras with near 0 latency through web.