How to Configure Hikvision Security Camera FTP for Cloud Recording
In this step-by-step guide, you’ll learn how to configure FTP settings on a Hikvision security camera. We’ll walk you through setting up the camera to upload frames at specific intervals (e.g., every 2 seconds), configuring motion detection, and scheduling frame uploads for specific days of the week.
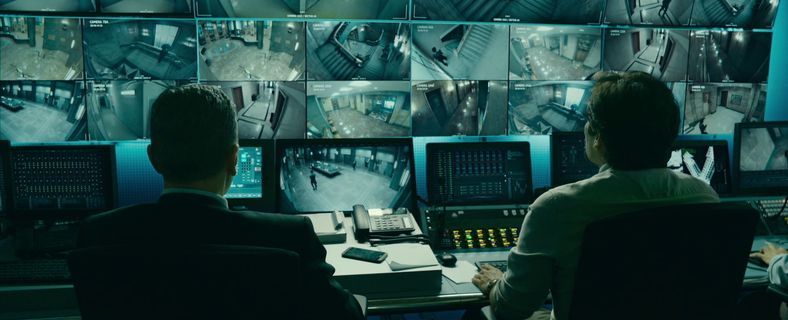
FTP frame upload is one of the simplest, most secure, and cost-effective methods for cloud video surveillance. Once your camera starts uploading frames to IP Camera Master, you can live-view footage, filter past recordings, and download frames directly to your computer. For more details on FTP cloud recording, check out this comprehensive guide.
While this guide uses a Hikvision camera for demonstration, the same steps apply to most security camera brands and models.
Let’s get started!
Step 1: Connect Your Camera To Router/Switch With Ethernet Cable And Power With Power Adapter
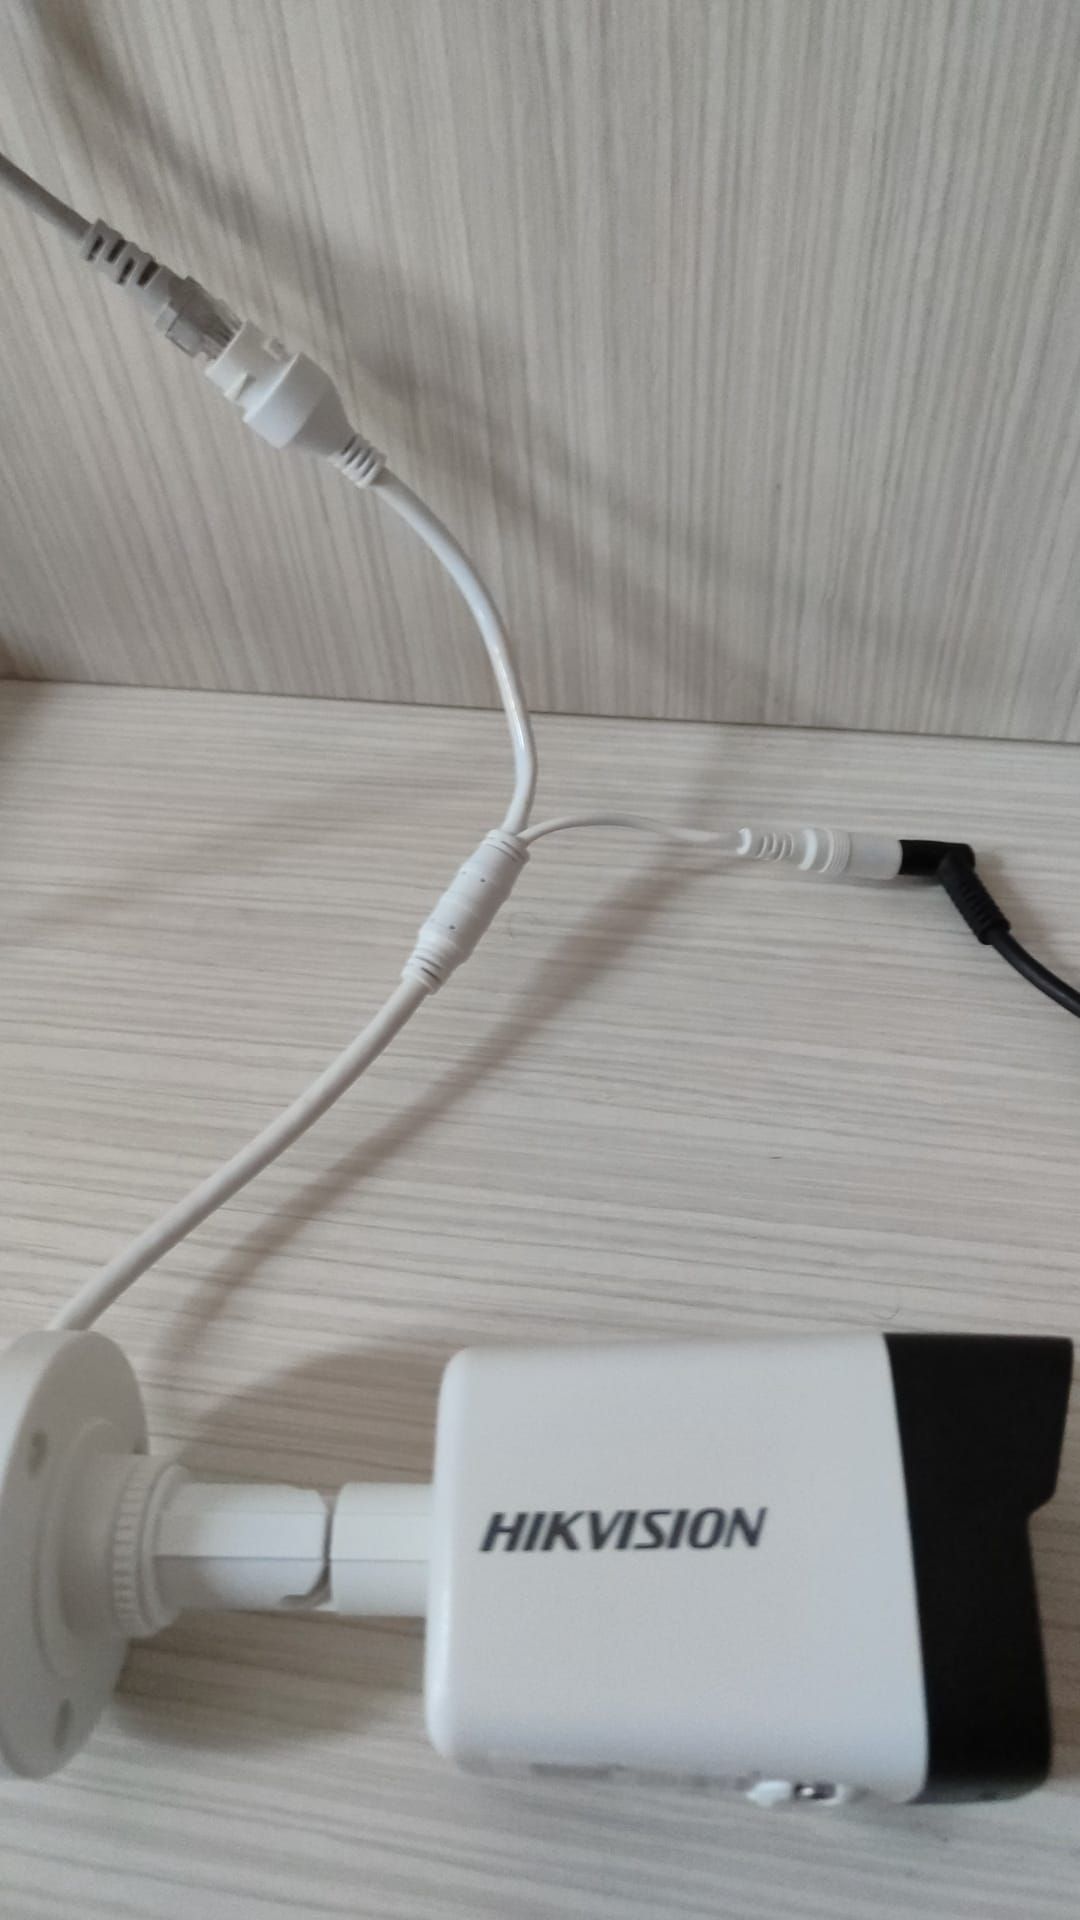
As simple as it sounds, the first step is to connect your camera to the internet using an Ethernet cable and power it with a compatible adapter. If camera did not come with a power adapter, you can just use an old laptop charger if it fits . Once both cables are connected, the camera should automatically power on and receive a local IP address. Most security cameras don’t have a power button or indicator light, so there’s no need to worry if you don’t see any visual confirmation. With the camera connected, you’re ready to move on to the next step.
Step 2: Find Local IP Address of Security Camera and Login Firmware Panel
1-) Download and Install the SADP Tool
Download the SADP Tool on your computer, ensuring it is connected to the same local network as your Hikvision camera. This tool helps you find the camera’s local IP address and set up the admin password.
2-) Launch and Detect the Camera
After installation, open the SADP Tool. It will automatically scan your network and detect any connected Hikvision cameras.
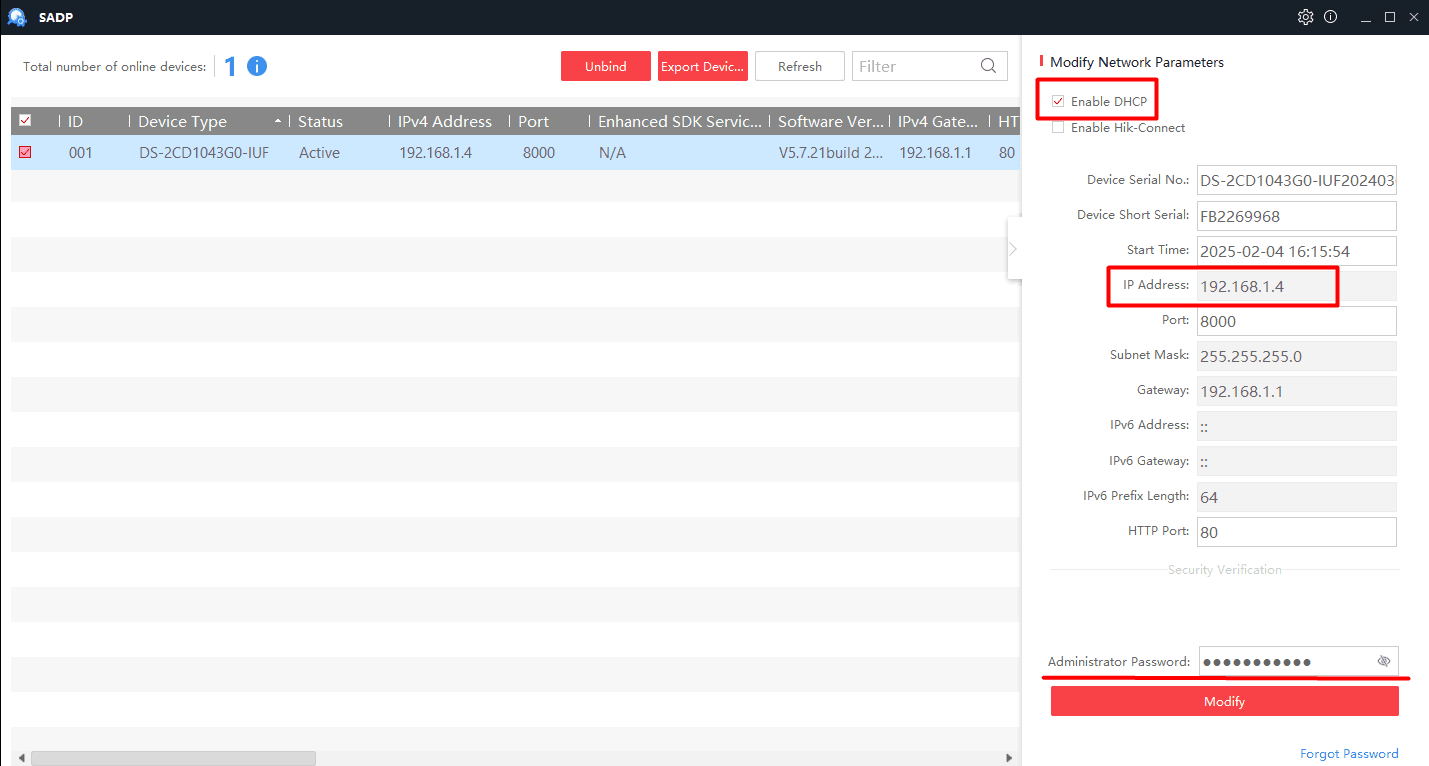
3-) Enable DHCP and Modify Settings
Click on the detected camera from the list. Check the "Enable DHCP" box. Click Modify to apply the changes. Obtain the Camera’s IP Address
Once modified, the camera will receive a new IP address from your network. This IP address is essential for accessing the firmware panel.
4-) Set Up the Admin Password
The tool will prompt you to configure a new admin password for the camera. You may also need to set security questions for password recovery. Choose a strong password and save it securely.
5-) Access the Camera’s Firmware Panel
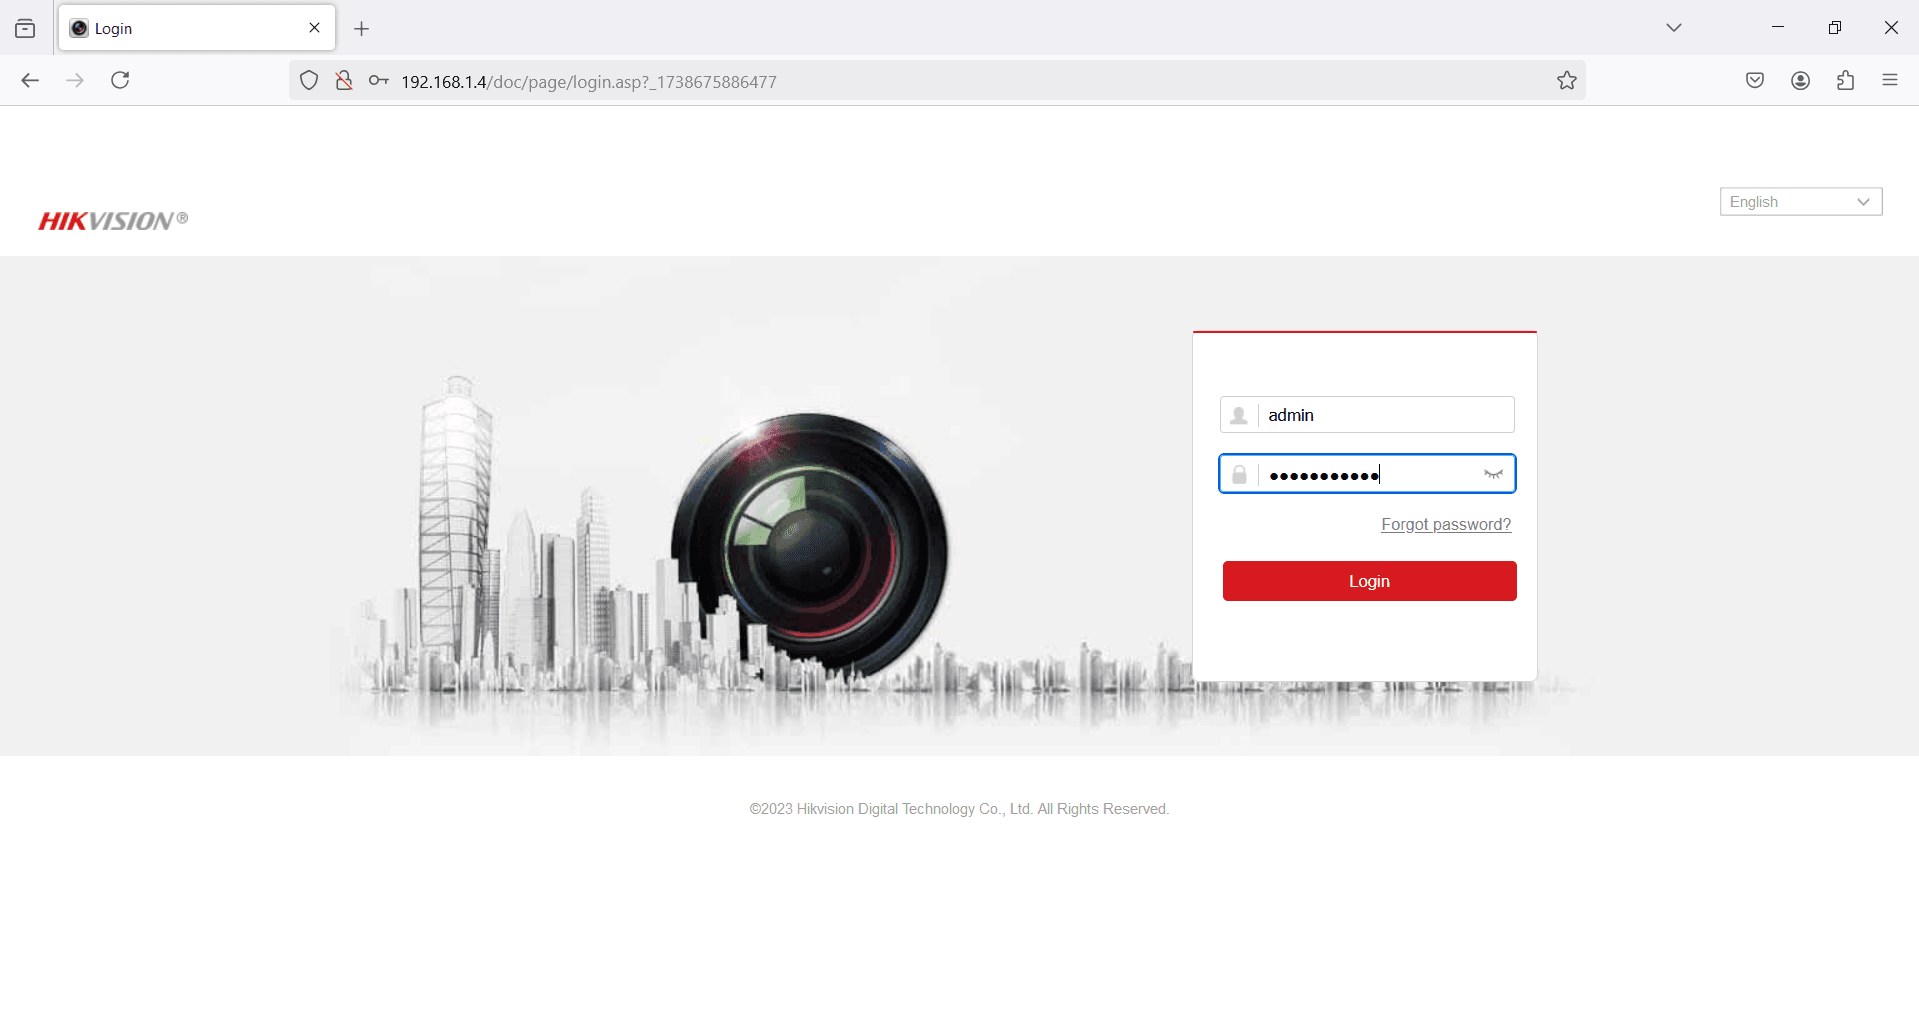
Open a web browser. Enter the camera’s assigned IP address in the address bar (e.g., 192.168.1.4). You will be directed to the camera’s login page. Login to the Camera
Username: admin
Password: Your newly configured password
Click Login to access the camera’s firmware settings. Once logged in, we can proceed with additional configurations such as FTP setup.
Step 3: Configure Correct Time
Usually security camera firmware times are set to 1970 by default. First thing first we need to set time of our camera correct.
Once you first login to the panel, you may be directed to live preview page. Click on "Configuration" from top menu.
Click on "System Settings" from left navigation menu. Then Click "Time Settings".

Here, you can configure the camera's time settings to match your local time zone.
If you plan to use NTP (Network Time Protocol), select the appropriate time zone. NTP will automatically synchronize the camera's time with a remote time server. Alternatively, you can set the time manually. The easiest method is to choose manual configuration and sync the time with your local computer.
Once the time is configured, click "Save" to apply the changes.
Step 4: Configure Frame Capture
On this step we will configure frame capture interval, days and captured frame quality.
Click on "Storage" -- "Schedule Settings" from left navigation menu. Then click on "Capture"
In this section, you can schedule when the camera captures frames and uploads them via FTP.
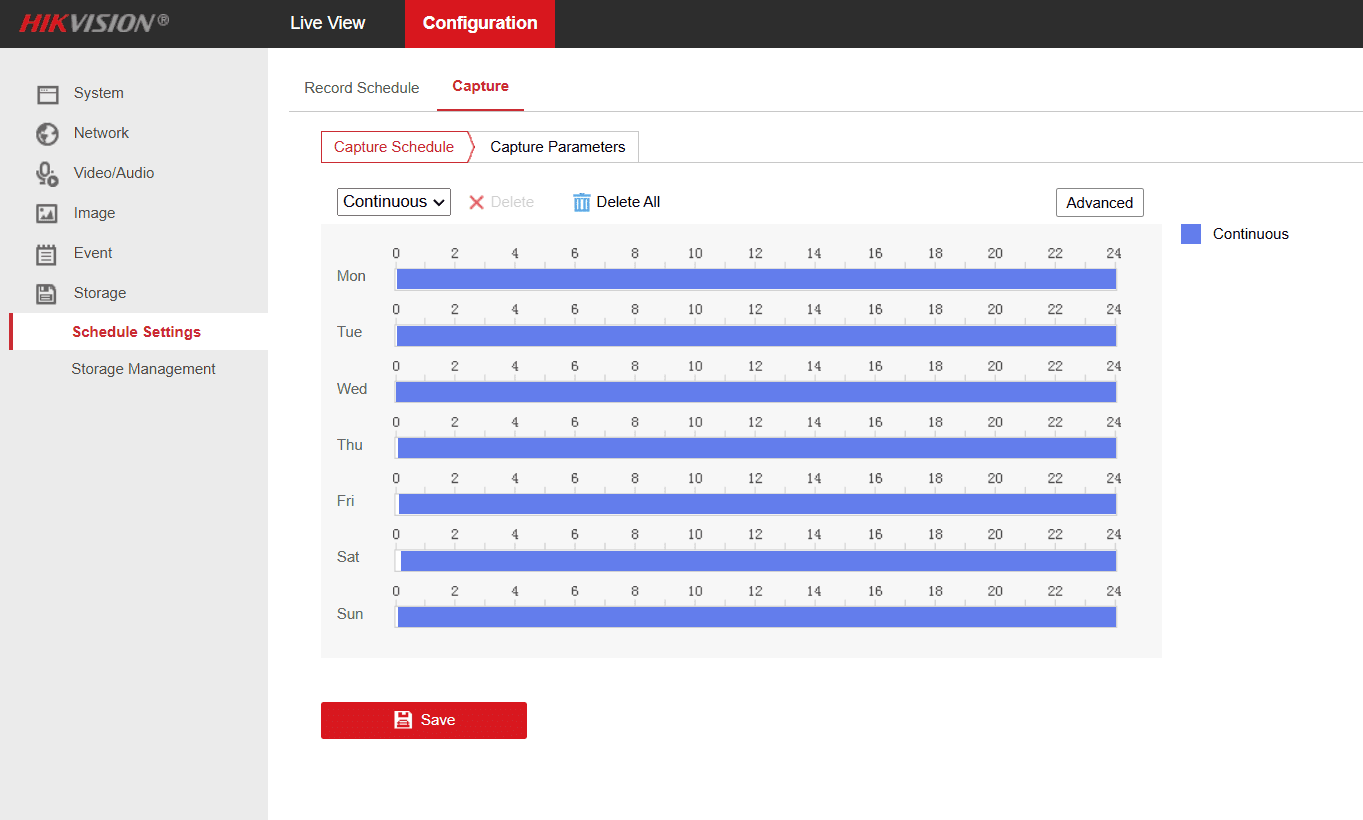
For testing purposes, select all days of the week to ensure everything is working correctly. After testing, you can refine the schedule—for example, enabling uploads only at night on weekdays to optimize storage and bandwidth.
Click on "Save"
Click on "Capture Parameters"
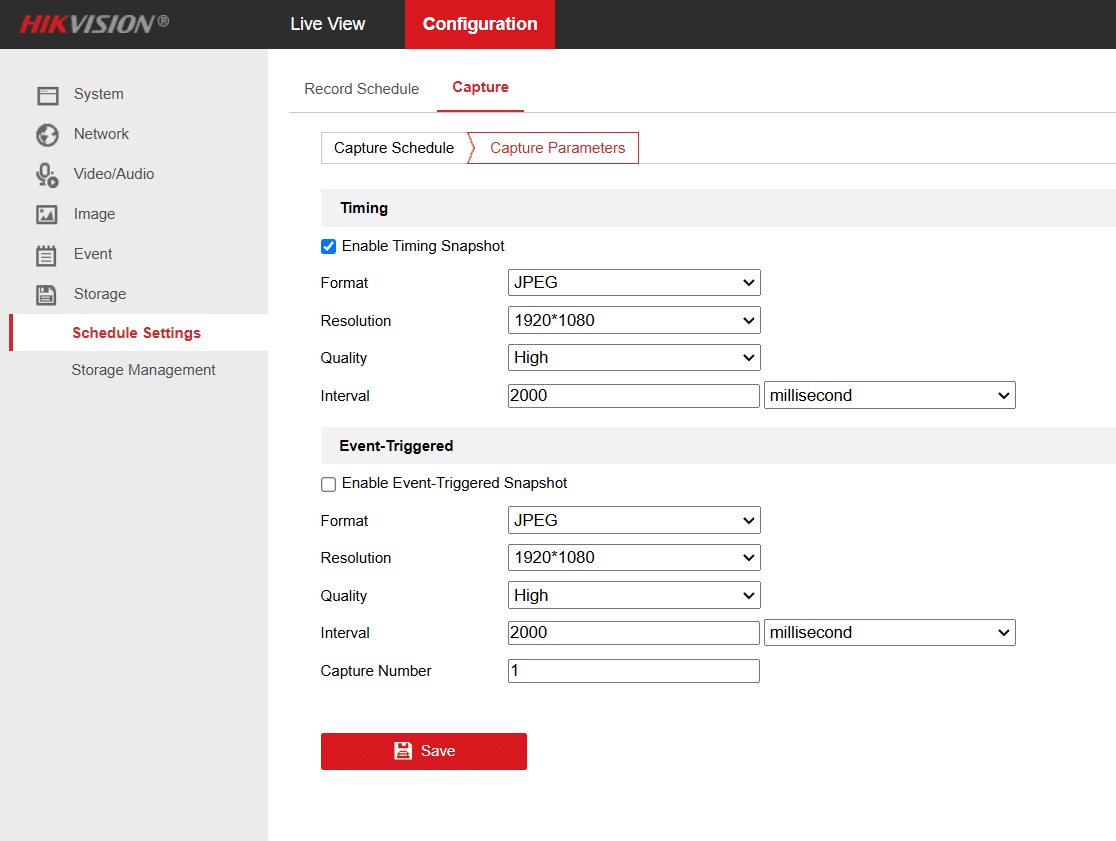
In this section you can choose quality and interval. Event triggered is for the captured frames which are on an event such as "Motion Detection". For now only enable Timing snapshot. Configure interval according to your IP Camera Master plan and needs.
High quality 1080p frames are usually sized around 250 kb. For testing set interval to 2000 ms. Remember you can change those any time you want.
Click on "Save"
Step 5: Create a New Camera On IP Camera Master
If you havent already, now its time to create a new camera on IP Camera Master via your dashboard. You can choose camera type any type you want as FTP is supported in all types. If you dont have an IP Camera Master account you can start your trial here and get 5 GB free ftp storage.
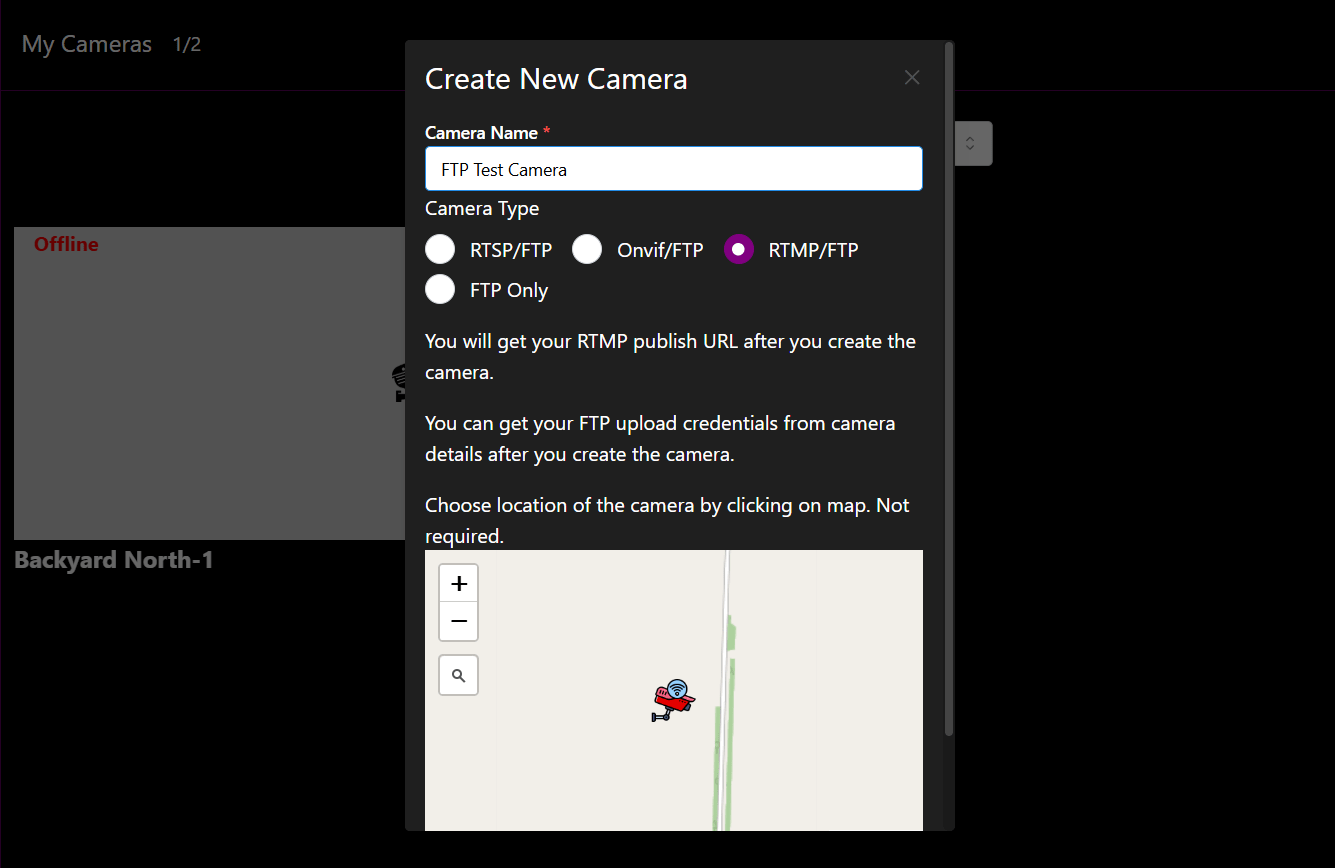
After camera is created click on "Actions" -- "Camera Settings"

Here you will see FTP address and a password for your camera. We will enter those to our cameras firmware FTP settings to link our camera with IP Camera Master.
Step 6: Link Camera and IP Camera Master With FTP
Go back to your cameras firmware panel. Click on "Network" -- "Advanced Settings". Click on "FTP"
In this section we will enter FTP credentials we obtained on Step 5. So that our security camera will be able to connect with IP Camera Master and start sending frames.
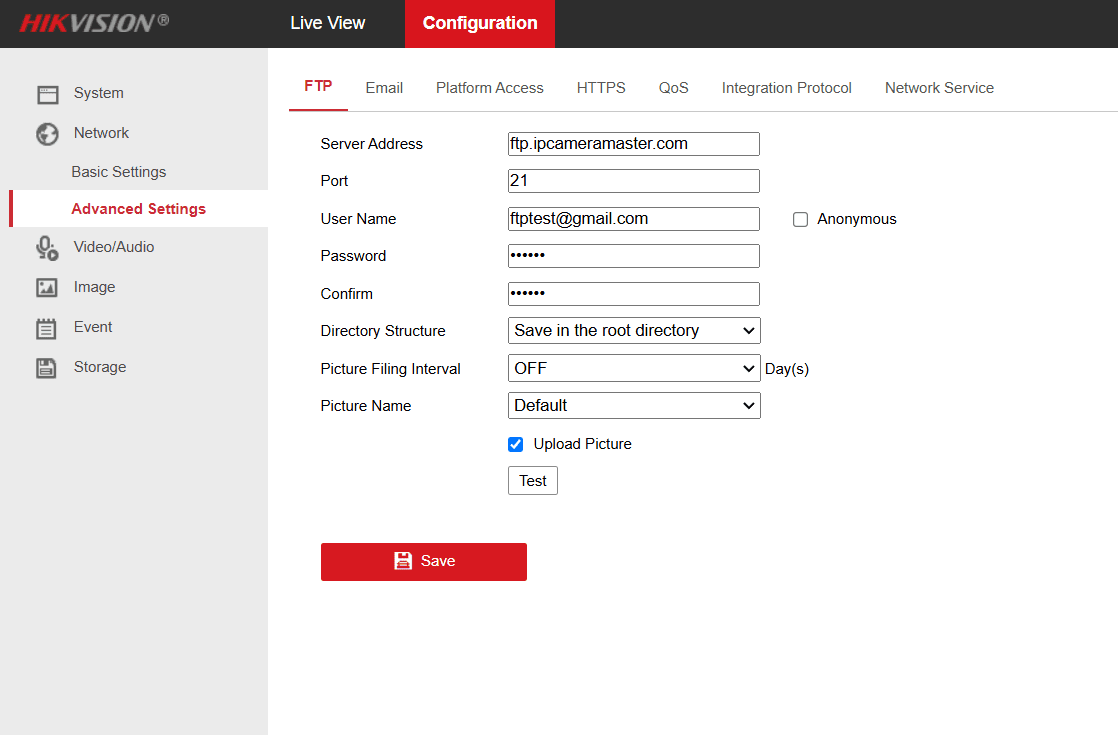
Server address: The ftp address you obtained at Step 5( e.g ftp.ipcameramaster.com)
Port: 21
User name: Your ip camera master account e-mail
Password: The camera password you obtained at Step 5
Directory Structure: Save root
Picture filling interval: OFF
Picture Name: Default
Check "Upload picture" checkbox.
In some cameras there is "Add date time to file name" checkbox, if it exists check it.
Click on "Save"
Now your camera should start sending frames with previously configured interval to IP Camera Master. Time to watch live footage from your dashboard!
Step 7: FTP Live View On IP Camera Master
Go to your ip camera master dashboard. Click on "FTP" from left navigation menu. Choose the configured camera name from drop down menu.
Now you should be able to watch frames live coming from your security camera! If you want you can download frames from action menu or retrieve spesific time interval.
Step 8: Event Based (Motion Detection) FTP Recording
If you desire, to save bandwidth and storage, you can configure your camera to only send frames when spesific events such as motion detection.
To do this go back to your cameras firmware panel.
Click on "Event" -- "Basic Event" from left navigation menu. Click on "Motion Detection" menu.
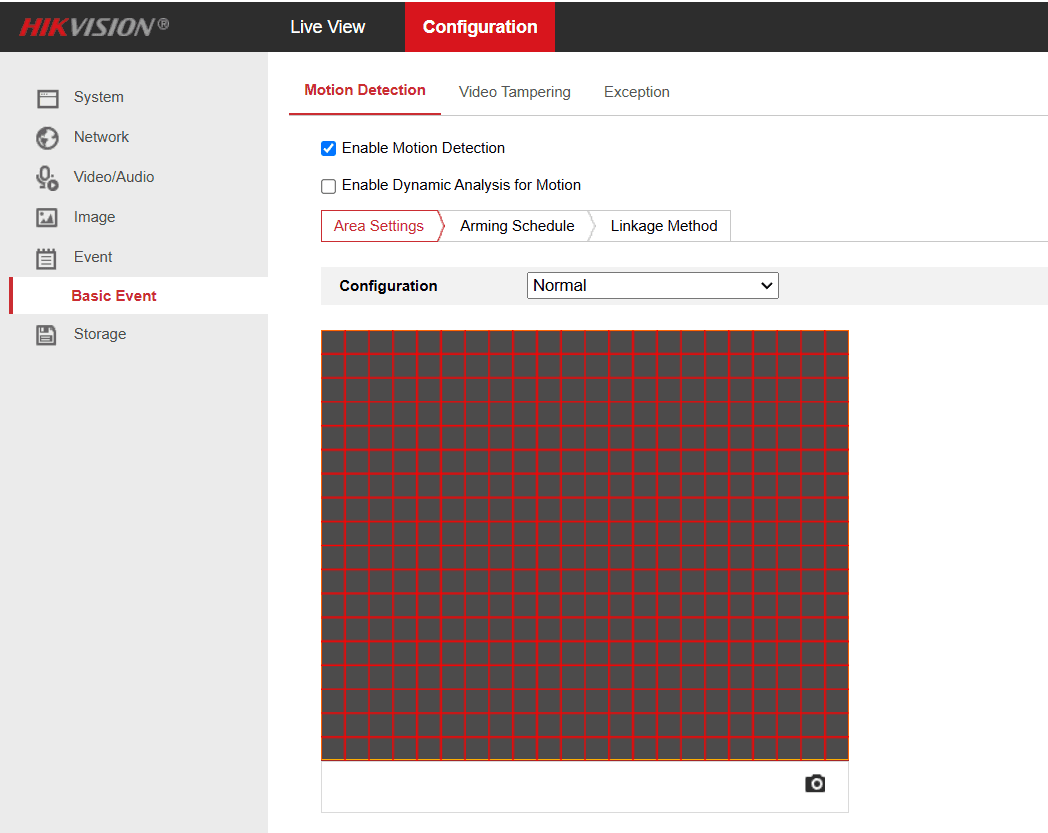
Check "Enable motion detection" checkbox. You can also play with motion detection sensitivity here.
Then click on "Linkage Method" and check "Upload to FTP" checkbox.
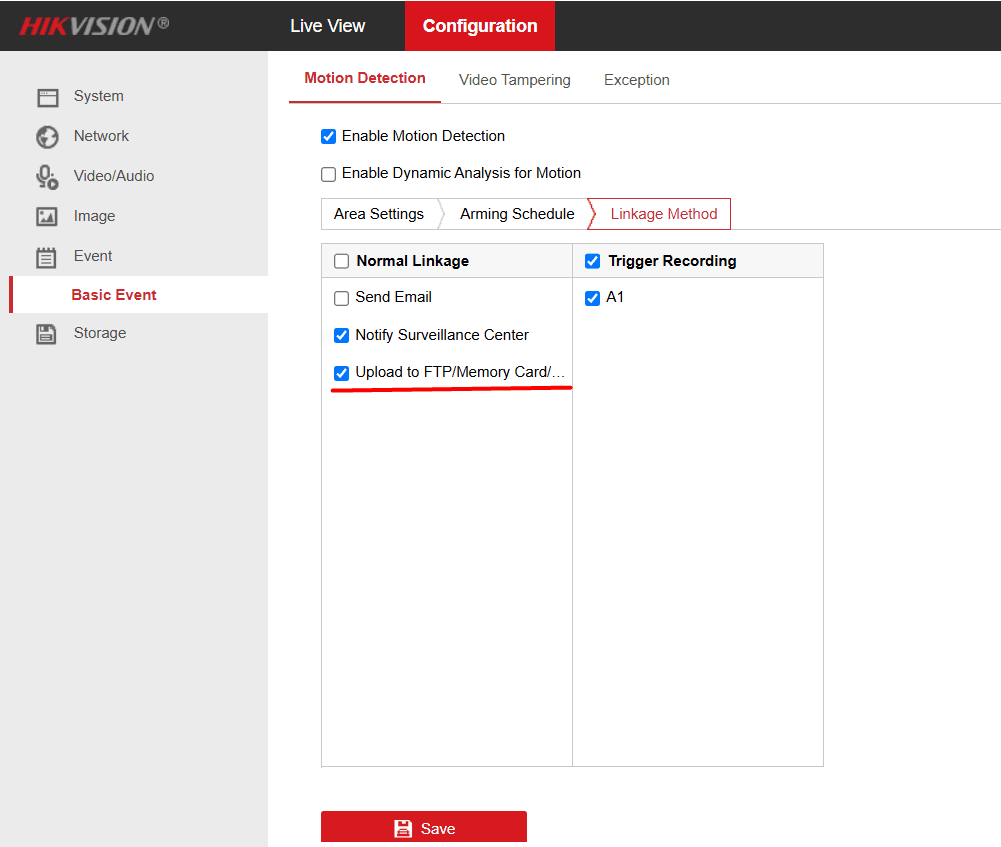
After that click on "Save"
Now we will enable "Event triggered snapshot" from "Storage" - "Schedule Settings" -- "Capture parameters" just like we did at Step 4.
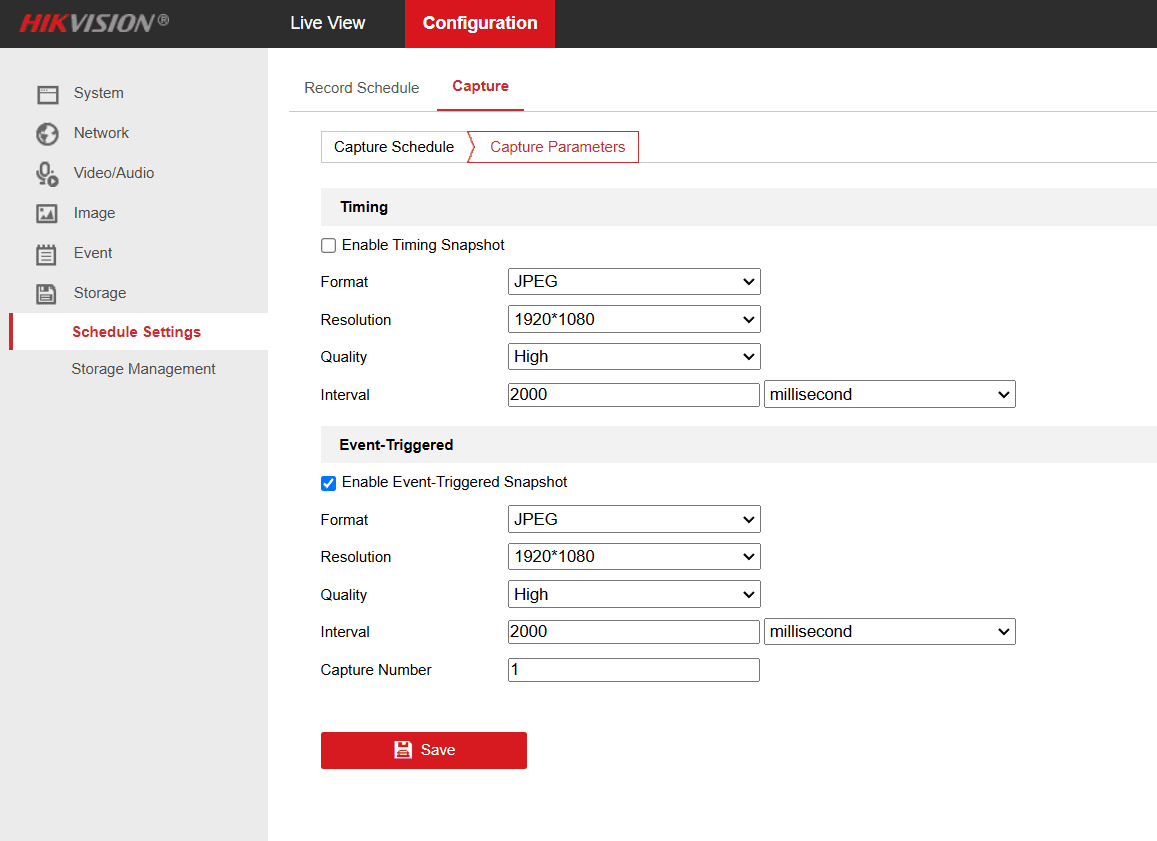
You can disable time-based snapshots and enable only event-triggered snapshots, ensuring your camera captures and uploads frames only when motion is detected. This helps reduce bandwidth and storage costs.
Experiment with the schedule and frame quality settings to find the optimal configuration that best suits your needs.
Click on "Save".
After those settings, your camera will only send frames in days you selected on motion detection event. This way you can save bandwidth and storage cost.
Conclusion
By following this guide, you can successfully configure your Hikvision security camera to upload frames via FTP, enabling seamless cloud storage and live viewing through IP Camera Master. Whether you're setting up continuous frame capture or event-based motion detection, these steps ensure a reliable and efficient setup.
If you encounter any issues or need further assistance, feel free to contact us at contact@ipcameramaster.com. Happy surveillance!
Similar Posts

How to Watch Your Security Cameras Online in Real-Time
2024-11-15Learn how to live watch your IP security cameras online step by step. With IP Camera Master you can watch your FTP, RTSP, RTMP security cameras with near 0 latency through web.
FTP vs RTSP for Security Cameras: Which is Best for Live Viewing and Cloud Recording?
2025-02-01Explore the key differences between FTP and RTSP for security cameras. Learn which protocol is best for live viewing and cloud recording, based on your needs for real-time streaming and secure footage storage.

Guide to Building the Most Affordable Video Cloud Surveillance for Property
2025-02-03Learn how to build the most robust and cost-effective cloud video surveillance system for your property - featuring example security camera hardware and IP Camera Master.